Transport Layer Security (TLS) with Calico Ingress
This lab demonstrates automated TLS certificate lifecycle management using cert-manager with a local Certificate Authority (CA). You'll learn how to install cert-manager, configure ClusterIssuers with local CAs, and implement both wildcard and dedicated certificates for different services.
Overview
What is cert-manager?
cert-manager is a powerful Kubernetes add-on that automates the management and issuance of TLS certificates. It supports various certificate authorities including internal CAs, HashiCorp Vault PKI, self-signed certificates, and public CAs like Let's Encrypt.
| Feature | Description |
|---|---|
| Automated Issuance | Automatically obtains certificates from CAs |
| Automatic Renewal | Renews certificates before expiry |
| Multiple CA Types | Supports internal CAs, Vault PKI, ACME, and more |
| ClusterIssuers | Cluster-wide certificate authority configuration |
| Gateway API Integration | Native support for Gateway API TLS |
Certificate Strategies
This lab demonstrates two common certificate strategies:
1. Wildcard Certificate (*.demo.lab)
- Used by: store.demo.lab, blog.demo.lab
- Pros: Single certificate for multiple subdomains, easier management
- Cons: Broader scope if private key is compromised
- Use case: Multiple apps under the same domain
2. Dedicated Certificate (api.demo.lab)
- Used by: api.demo.lab
- Pros: Better isolation, independent lifecycle, can rotate without affecting others
- Cons: More certificates to manage
- Use case: Critical APIs requiring enhanced security isolation
Lab Setup
Prerequisites:
- ContainerLab installed
- Docker installed
- kubectl configured
To setup the lab for this module Lab setup
The lab folder is - /containerlab/20-ingress-tls
Manifest Files
ContainerLab
| File | Description |
|---|---|
| topology.clab.yaml | ContainerLab topology with Arista switch and Kind cluster |
Kind Cluster
| File | Description |
|---|---|
| k01-no-cni.yaml | Kind cluster configuration without CNI |
Calico CNI
| File | Description |
|---|---|
| calico-cni-config/custom-resources.yaml | Custom Calico Installation resource with IPAM configuration |
| calico-cni-config/gatewayapi.yaml | Gateway API configuration for Calico |
| calico-cni-config/bgpconfiguration.yaml | BGP Configuration resource |
| calico-cni-config/bgppeer.yaml | BGP Peer resource for Arista switch peering |
Kubernetes Manifests
| File | Description |
|---|---|
| k8s-manifests/gateway.yaml | TLS Gateway resource definition |
| k8s-manifests/httproutes.yaml | HTTPRoutes for host-based traffic routing |
| k8s-manifests/reference-grant.yaml | ReferenceGrant for cross-namespace Gateway access |
| k8s-manifests/app-store.yaml | Store application deployment and service |
| k8s-manifests/app-blog.yaml | Blog application deployment and service |
| k8s-manifests/app-api.yaml | API application deployment and service |
| k8s-manifests/lb-ippool.yaml | LoadBalancer IP pool definition |
TLS Configuration
| File | Description |
|---|---|
| tls-config/cluster-issuers.yaml | cert-manager ClusterIssuers for CA and self-signed |
| tls-config/certificates.yaml | TLS certificate resources for domain certificates |
Startup Configs
| File | Description |
|---|---|
| startup-configs/ceos01-startup-config.config | Arista cEOS switch startup configuration |
Lab Exercises
NoteThe outputs in this section will be different in your lab. When running the commands given in this section, make sure you replace IP addresses, interface names, and node names as per your lab.
1. Deploy and Verify the Lab
1.1 Deploy the Lab Infrastructure
cd containerlab/20-ingress-tls
chmod +x deploy.sh
./deploy.sh
The deploy script will:
- Deploy the ContainerLab topology
- Install Calico with BGP configuration
- Enable Calico Gateway API
Notecert-manager, demo applications, certificates, and Gateway resources arenot pre-configured. You will install and create them manually in this lab to understand how they work together.
1.2 Set Up Environment
Set the kubeconfig for this lab:
export KUBECONFIG=$(pwd)/k01.kubeconfig
Verify the nodes are ready:
kubectl get nodes -o wide
NAME                STATUS   ROLES           AGE   VERSION   INTERNAL-IP    ...
k01-control-plane   Ready    control-plane   10m   v1.32.2   10.10.10.10    ...
k01-worker          Ready    <none>          9m    v1.32.2   10.10.10.11    ...
k01-worker2         Ready    <none>          9m    v1.32.2   10.10.10.12    ...
k01-worker3         Ready    <none>          9m    v1.32.2   10.10.10.13    ...
k01-worker4         Ready    <none>          9m    v1.32.2   10.10.10.14    ...
1.3 Verify GatewayClass
Confirm the GatewayClass is available:
kubectl get gatewayclass
NAME                   CONTROLLER                                      ACCEPTED   AGE
tigera-gateway-class   gateway.envoyproxy.io/gatewayclass-controller   True       5m
2. Install cert-manager
In this phase, you'll install cert-manager to manage TLS certificates in your cluster.
2.1 Understand cert-manager Components
cert-manager consists of several components:
| Component | Description |
|---|---|
| Controller | Watches Certificate resources and issues certificates |
| Webhook | Validates and mutates cert-manager resources |
| CA Injector | Injects CA bundles into webhooks and API services |
2.2 Install cert-manager
Install cert-manager using the official manifest:
kubectl apply -f https://github.com/cert-manager/cert-manager/releases/download/v1.16.2/cert-manager.yaml
namespace/cert-manager created
customresourcedefinition.apiextensions.k8s.io/certificaterequests.cert-manager.io created
customresourcedefinition.apiextensions.k8s.io/certificates.cert-manager.io created
customresourcedefinition.apiextensions.k8s.io/challenges.acme.cert-manager.io created
customresourcedefinition.apiextensions.k8s.io/clusterissuers.cert-manager.io created
customresourcedefinition.apiextensions.k8s.io/issuers.cert-manager.io created
customresourcedefinition.apiextensions.k8s.io/orders.acme.cert-manager.io created
...
deployment.apps/cert-manager created
deployment.apps/cert-manager-cainjector created
deployment.apps/cert-manager-webhook created
2.3 Wait for cert-manager to be Ready
Wait for all cert-manager deployments to be available:
kubectl wait --for=condition=available --timeout=300s deployment/cert-manager -n cert-manager
kubectl wait --for=condition=available --timeout=300s deployment/cert-manager-webhook -n cert-manager
kubectl wait --for=condition=available --timeout=300s deployment/cert-manager-cainjector -n cert-manager
deployment.apps/cert-manager condition met
deployment.apps/cert-manager-webhook condition met
deployment.apps/cert-manager-cainjector condition met
2.4 Verify cert-manager Installation
Check that cert-manager pods are running:
kubectl get pods -n cert-manager
NAME                                       READY   STATUS    RESTARTS   AGE
cert-manager-7f8d9b6c5d-xxxxx              1/1     Running   0          1m
cert-manager-cainjector-5c9d8b7c6d-xxxxx   1/1     Running   0          1m
cert-manager-webhook-6d8f9c7b5e-xxxxx      1/1     Running   0          1m
What each pod does:
| Pod | Description |
|---|---|
| cert-manager | The main controller that watches for Certificate, CertificateRequest, and Issuer resources. It processes certificate requests, communicates with CAs, and stores issued certificates as Kubernetes Secrets. |
| cert-manager-cainjector | Injects CA certificates into webhook configurations, API services, and Custom Resource Definitions. This ensures that components trusting cert-manager-issued certificates have the correct CA bundle. |
| cert-manager-webhook | A validating and mutating admission webhook that validates cert-manager resources before they're persisted. It ensures Certificate and Issuer configurations are correct and converts between API versions. |
Verify cert-manager CRDs are installed:
kubectl get crds | grep cert-manager
certificaterequests.cert-manager.io       2024-01-15T12:00:00Z
certificates.cert-manager.io              2024-01-15T12:00:00Z
challenges.acme.cert-manager.io           2024-01-15T12:00:00Z
clusterissuers.cert-manager.io            2024-01-15T12:00:00Z
issuers.cert-manager.io                   2024-01-15T12:00:00Z
orders.acme.cert-manager.io               2024-01-15T12:00:00Z
2.5 Test cert-manager with a Self-Signed Certificate
Before proceeding, let's verify cert-manager is working correctly by creating a test certificate. This smoke test validates that:
- The cert-manager controller can process Certificate resources
- The cert-manager webhook can validate and admit resources
- cert-manager can generate real X.509 certificates and store them as Kubernetes Secrets
NoteThis test uses a self-signed issuer because it requires no external dependencies and issues certificates instantly. The certificate created is a real, cryptographically valid X.509 certificate - just not trusted by browsers since it's self-signed. This same concept applies to the Lab CA we'll create later.
Create the test resources:
cat <<EOF | kubectl apply -f -
apiVersion: v1
kind: Namespace
metadata:
  name: cert-manager-test
---
apiVersion: cert-manager.io/v1
kind: Issuer
metadata:
  name: test-selfsigned
  namespace: cert-manager-test
spec:
  selfSigned: {}
---
apiVersion: cert-manager.io/v1
kind: Certificate
metadata:
  name: selfsigned-cert
  namespace: cert-manager-test
spec:
  dnsNames:
    - example.com
  secretName: selfsigned-cert-tls
  issuerRef:
    name: test-selfsigned
EOF
Verify the test certificate is issued:
kubectl get certificate -n cert-manager-test
NAME              READY   SECRET                AGE
selfsigned-cert   True    selfsigned-cert-tls   10s
When the Certificate resource was created:
- cert-manager generated a private key
- Created a Certificate Signing Request (CSR)
- Signed the certificate using the self-signed issuer
- Stored the certificate in a Kubernetes Secret (
selfsigned-cert-tls)
You can inspect the actual certificate:
kubectl get secret selfsigned-cert-tls -n cert-manager-test -o jsonpath='{.data.tls\.crt}' | base64 -d | openssl x509 -text -noout | head -15
Certificate:
    Data:
        Version: 3 (0x2)
        Serial Number: ...
        Signature Algorithm: ecdsa-with-SHA256
        Issuer:
        Validity
            Not Before: Jan 15 12:00:00 2024 GMT
            Not After : Apr 15 12:00:00 2024 GMT
        Subject:
        Subject Public Key Info:
            Public Key Algorithm: id-ecPublicKey
Clean up the test resources:
kubectl delete namespace cert-manager-test
3. Deploy Demo Applications
In this phase, you'll deploy three demo applications that will be exposed via the TLS Gateway.
3.1 Create the Demo Namespace
kubectl create namespace cert-manager-demo
namespace/cert-manager-demo created
3.2 Examine the Store Application
First, examine the Store application manifest:
cat k8s-manifests/app-store.yaml
Key points:
- Creates a Deployment with nginx serving a custom HTML page
- Creates a ClusterIP Service on port 80
- Uses the
cert-manager-demonamespace - Pods are scheduled on non-BGP worker nodes (worker3, worker4)
3.3 Deploy the Store Application
kubectl apply -f k8s-manifests/app-store.yaml
configmap/store-html created
deployment.apps/store created
service/store created
3.4 Deploy the Blog Application
Examine and deploy the Blog application:
cat k8s-manifests/app-blog.yaml
kubectl apply -f k8s-manifests/app-blog.yaml
configmap/blog-html created
deployment.apps/blog created
service/blog created
3.5 Deploy the API Application
Examine and deploy the API application:
cat k8s-manifests/app-api.yaml
kubectl apply -f k8s-manifests/app-api.yaml
configmap/api-html created
deployment.apps/api created
service/api created
3.6 Verify Application Deployments
Check that all pods are running:
kubectl get pods -n cert-manager-demo -o wide
NAME                     READY   STATUS    RESTARTS   AGE   IP              NODE          ...
store-xxxxxxxxxx-xxxxx   1/1     Running   0          1m    192.168.x.x     k01-worker3   ...
store-xxxxxxxxxx-xxxxx   1/1     Running   0          1m    192.168.x.x     k01-worker4   ...
blog-xxxxxxxxxx-xxxxx    1/1     Running   0          1m    192.168.x.x     k01-worker3   ...
blog-xxxxxxxxxx-xxxxx    1/1     Running   0          1m    192.168.x.x     k01-worker4   ...
api-xxxxxxxxxx-xxxxx     1/1     Running   0          1m    192.168.x.x     k01-worker3   ...
api-xxxxxxxxxx-xxxxx     1/1     Running   0          1m    192.168.x.x     k01-worker4   ...
Check the services:
kubectl get svc -n cert-manager-demo
NAME    TYPE        CLUSTER-IP      EXTERNAL-IP   PORT(S)   AGE
store   ClusterIP   10.96.x.x       <none>        80/TCP    1m
blog    ClusterIP   10.96.x.x       <none>        80/TCP    1m
api     ClusterIP   10.96.x.x       <none>        80/TCP    1m
4. Create Certificate Issuers
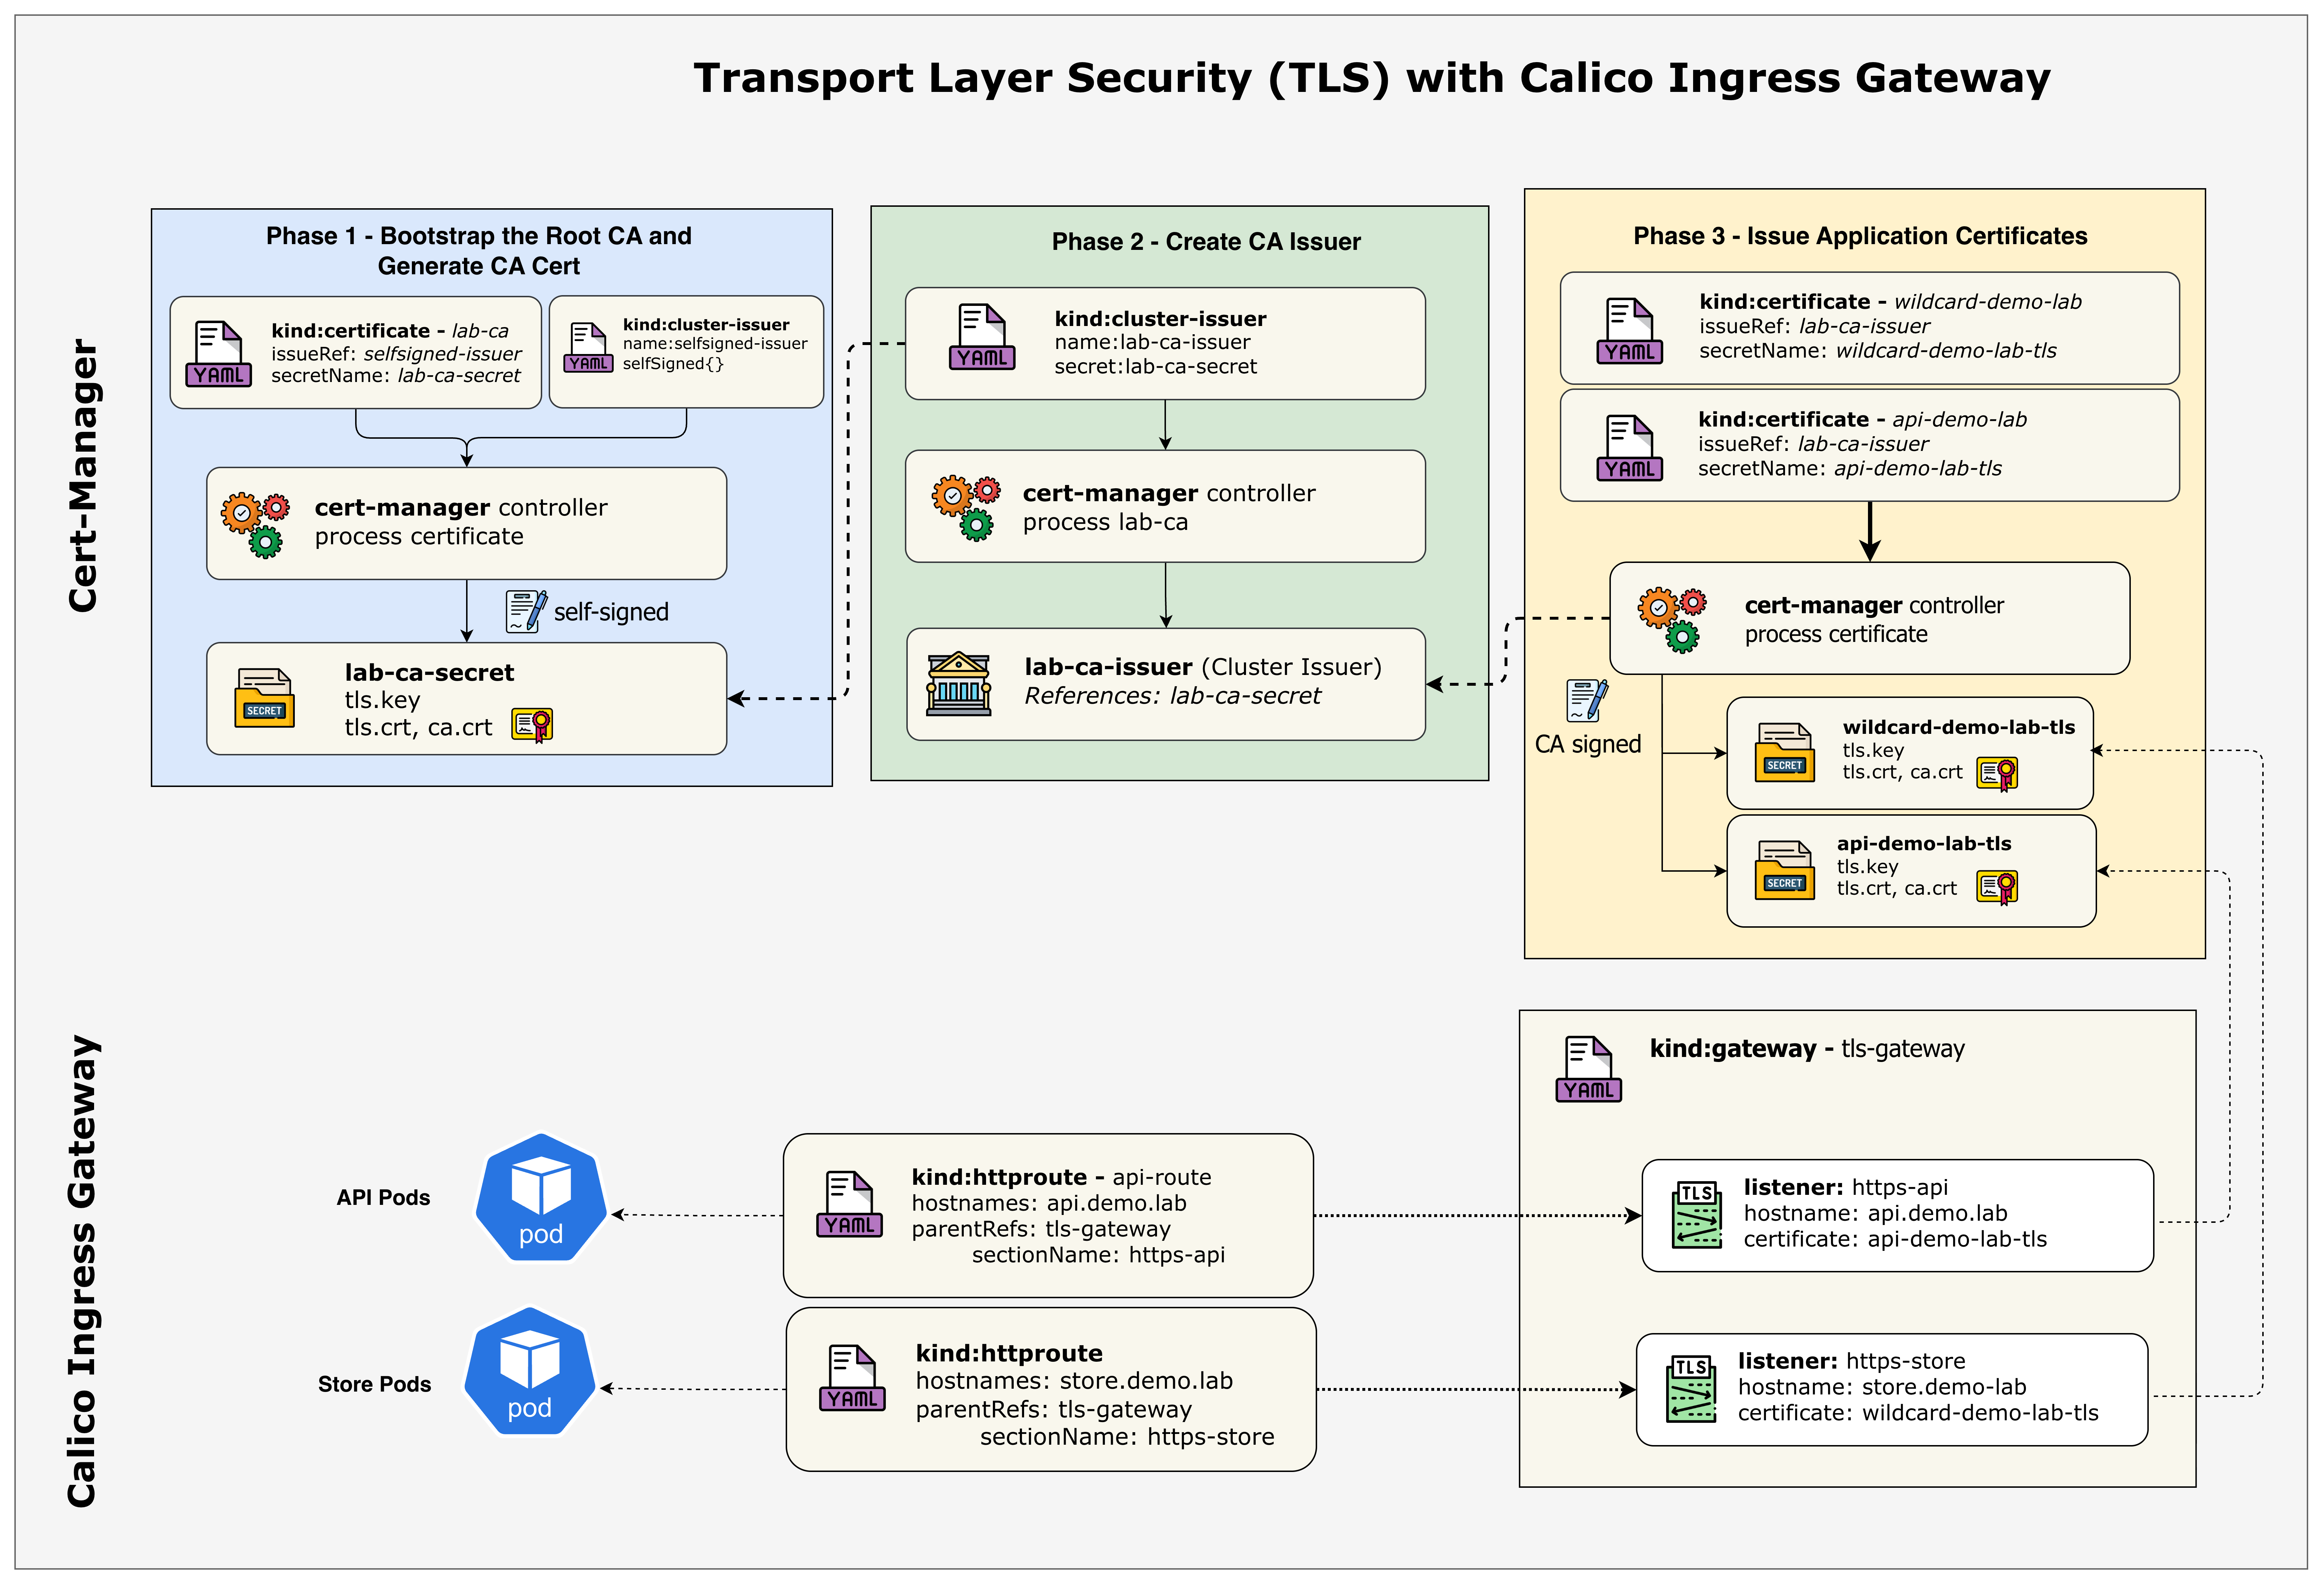
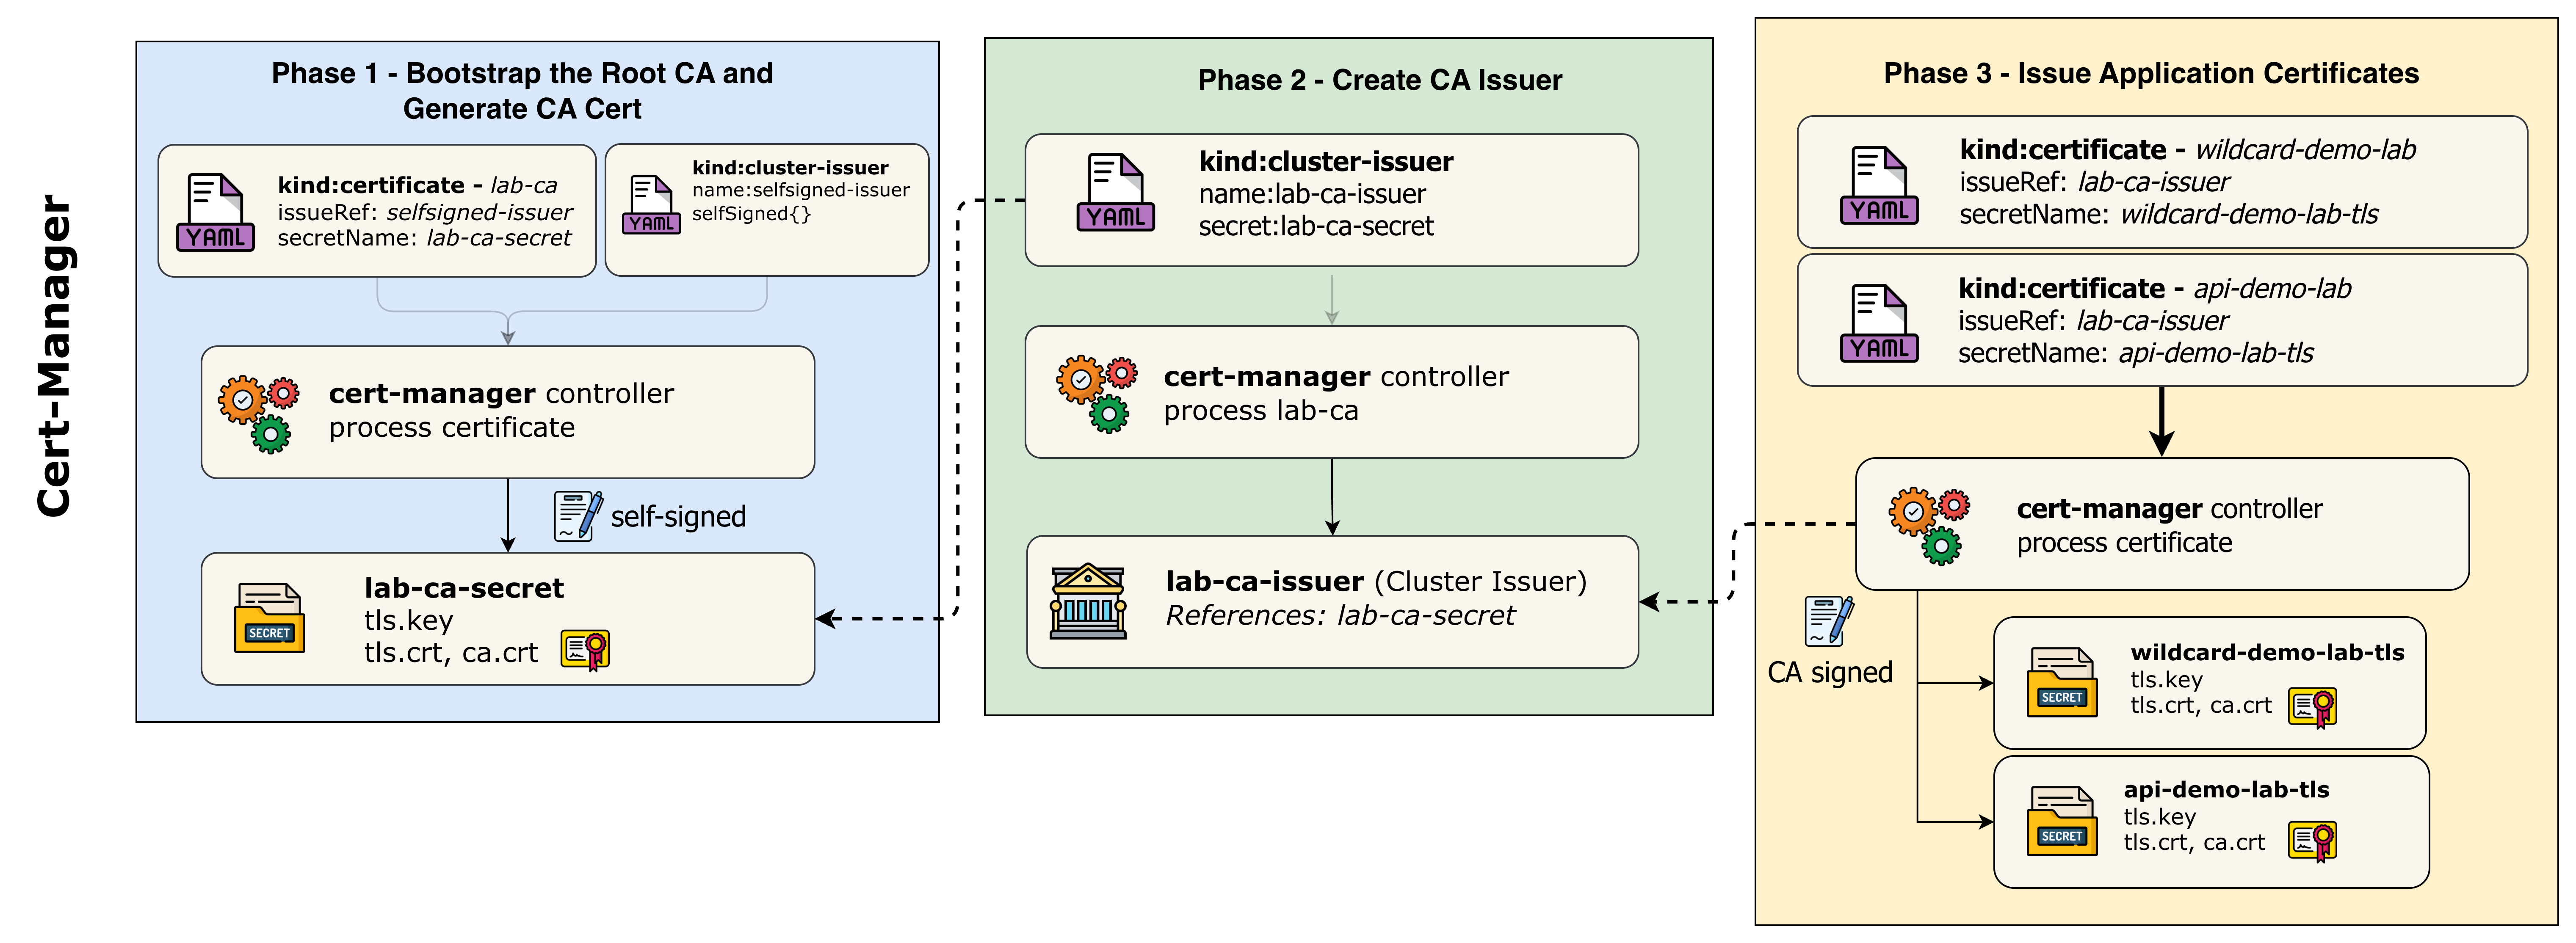
In this phase, you'll create ClusterIssuers that define how certificates are obtained. Since this is a lab environment, we use local Certificate Authorities instead of public CAs like Let's Encrypt.
4.1 Understand ClusterIssuers
Examine the ClusterIssuer manifest:
cat tls-config/cluster-issuers.yaml
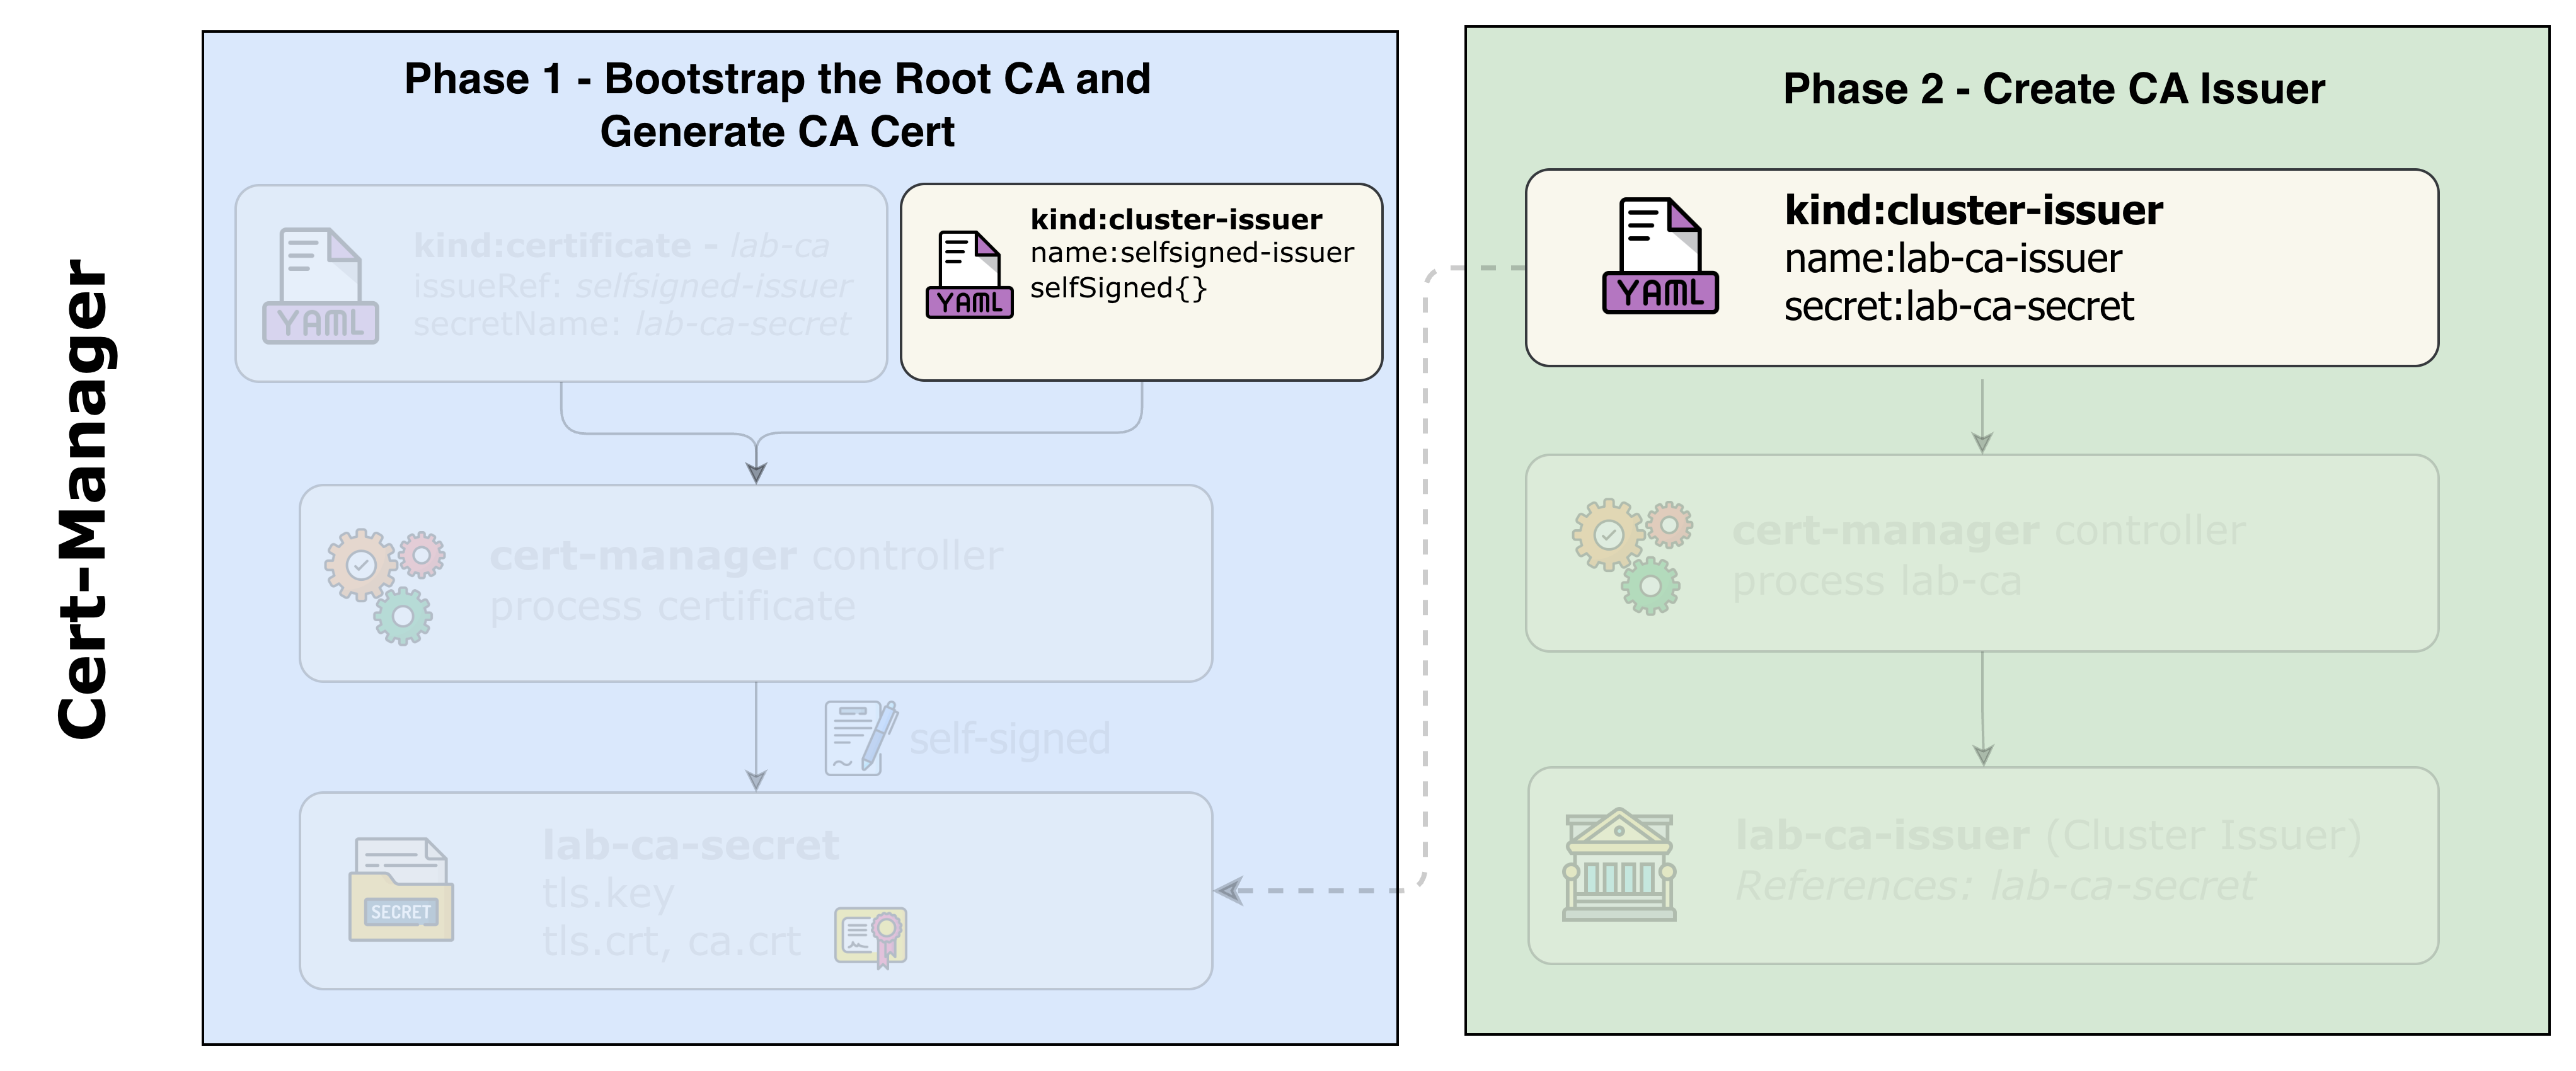
The cluster-issuers.yaml file contains two issuers for the lab:
| Issuer | Purpose |
|---|---|
selfsigned-issuer | Bootstrapping - creates the root CA certificate |
lab-ca-issuer | Primary issuer - signs certificates using the Lab CA |
Self-Signed Issuer (for bootstrapping):
apiVersion: cert-manager.io/v1
kind: ClusterIssuer
metadata:
  name: selfsigned-issuer
spec:
  selfSigned: {}
Lab CA Issuer (primary):
apiVersion: cert-manager.io/v1
kind: ClusterIssuer
metadata:
  name: lab-ca-issuer
spec:
  ca:
    secretName: lab-ca-secret
NoteWhy use a local CA instead of self-signed certificates?
- Self-signed certs are signed by their own key (no trust chain)
- CA-signed certs have a proper chain:
Root CA → Leaf Certificate- You can trust the CA once and all issued certs are trusted
- This mirrors how enterprise PKI and public CAs work
4.2 Create the ClusterIssuers
kubectl apply -f tls-config/cluster-issuers.yaml
clusterissuer.cert-manager.io/selfsigned-issuer created
clusterissuer.cert-manager.io/lab-ca-issuer created
4.3 Verify ClusterIssuers
Check that all issuers are ready:
kubectl get clusterissuers -o wide
NAME                READY   STATUS                                               AGE
selfsigned-issuer   True                                                         30s
lab-ca-issuer       False   Error initializing issuer: secret not found          30s
NoteThe
lab-ca-issuershows an error because we haven't created the CA certificate yet. This is expected - we'll create it in the next phase when we apply the certificates.
5. Issue Certificates
Now you'll create Certificate resources that request certificates from our Lab CA.
5.1 Understand the Certificate Resources
Examine the certificates manifest:
cat tls-config/certificates.yaml
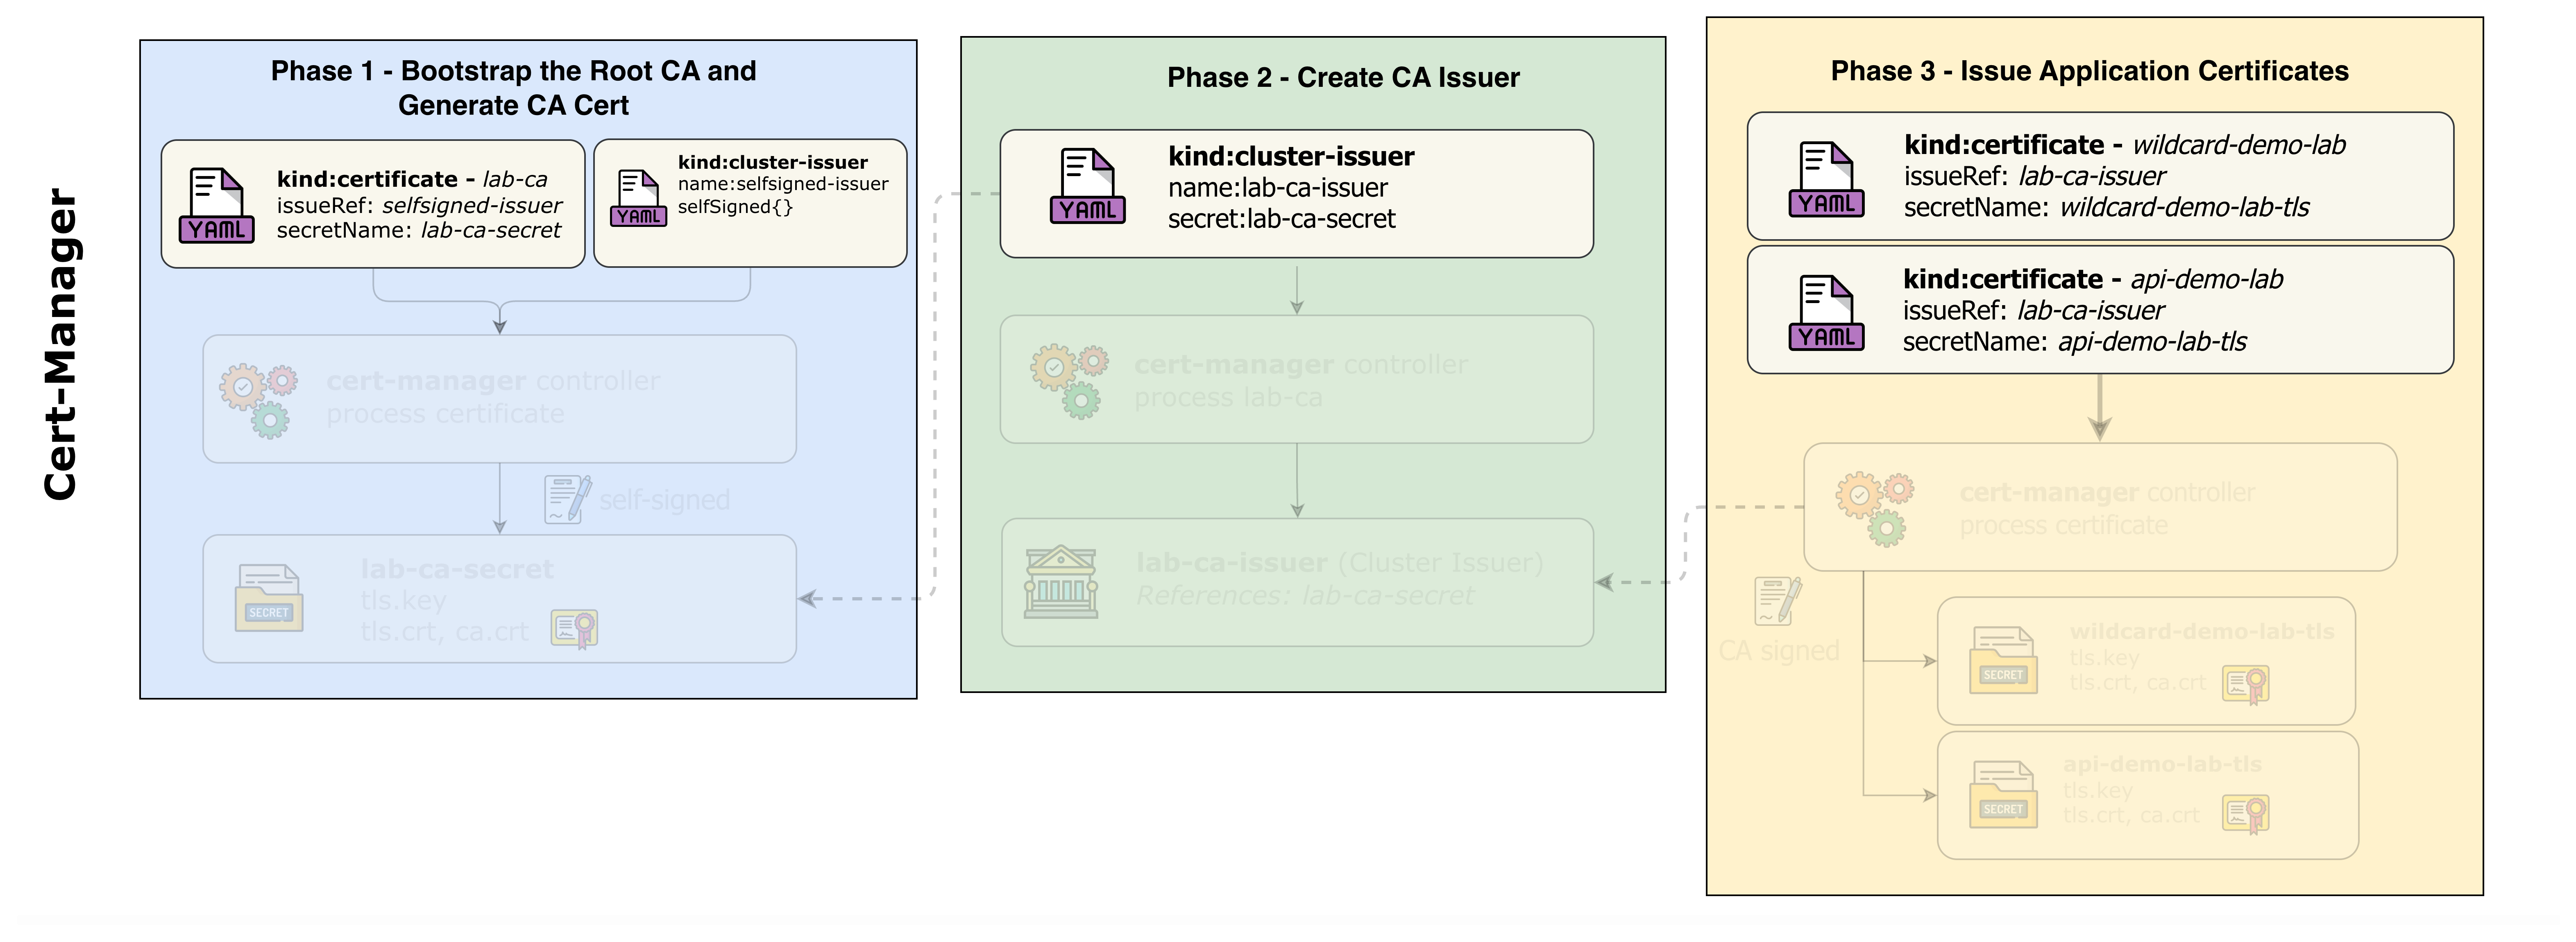
The certificates.yaml file defines three certificates in a specific order:
1. Lab CA Certificate (creates the root CA - must be created first):
apiVersion: cert-manager.io/v1
kind: Certificate
metadata:
  name: lab-ca
  namespace: cert-manager
spec:
  isCA: true                        # This is a CA certificate
  secretName: lab-ca-secret         # Where the CA cert/key is stored
  commonName: "Demo Lab Certificate Authority"
  duration: 87600h                  # 10 years validity
  issuerRef:
    name: selfsigned-issuer         # Self-sign the root CA
    kind: ClusterIssuer
2. Wildcard Certificate (for store.demo.lab and blog.demo.lab):
apiVersion: cert-manager.io/v1
kind: Certificate
metadata:
  name: wildcard-demo-lab
  namespace: cert-manager-demo
spec:
  secretName: wildcard-demo-lab-tls
  commonName: "*.demo.lab"
  dnsNames:
    - "*.demo.lab"                  # Covers all subdomains
    - "demo.lab"                    # Also cover apex domain
  issuerRef:
    name: lab-ca-issuer             # Signed by our Lab CA
    kind: ClusterIssuer
3. Dedicated Certificate (for api.demo.lab only):
apiVersion: cert-manager.io/v1
kind: Certificate
metadata:
  name: api-demo-lab
  namespace: cert-manager-demo
spec:
  secretName: api-demo-lab-tls
  commonName: "api.demo.lab"
  dnsNames:
    - "api.demo.lab"                # Only valid for this domain
  issuerRef:
    name: lab-ca-issuer             # Signed by our Lab CA
    kind: ClusterIssuer
NoteCertificate chain: The Lab CA is self-signed, but the wildcard and API certificates are signed by the Lab CA. This creates a proper trust chain just like in production PKI environments.
Certificate Chain & Key Generation Diagram:
Rendering diagram…
Key Points:
| Step | What Happens | Private Key | Who Signs |
|---|---|---|---|
| 1 | Lab CA Certificate created | cert-manager generates Key #1 | Self-signed (Key #1 signs its own cert) |
| 2 | lab-ca-issuer configured | No new key - references lab-ca-secret | N/A - just config |
| 3 | Wildcard cert created | cert-manager generates Key #2 | Lab CA (using Key #1) |
| 4 | API cert created | cert-manager generates Key #3 | Lab CA (using Key #1) |
ImportantSelf-signing explained: When
selfsigned-issuerprocesses a certificate, cert-manager generates a new private key, creates a CSR, then signs that CSR with the same private key it just generated. The certificate literally signs itself - that's why it's called "self-signed." This is only used for root CAs.
5.2 Create the Certificates
kubectl apply -f tls-config/certificates.yaml
certificate.cert-manager.io/lab-ca created
certificate.cert-manager.io/wildcard-demo-lab created
certificate.cert-manager.io/api-demo-lab created
5.3 Watch Certificate Issuance
Watch cert-manager issue the certificates:
kubectl get certificates -A -w
NAMESPACE           NAME                READY   SECRET                   AGE
cert-manager        lab-ca              False   lab-ca-secret            0s
cert-manager-demo   wildcard-demo-lab   False   wildcard-demo-lab-tls    0s
cert-manager-demo   api-demo-lab        False   api-demo-lab-tls         0s
cert-manager        lab-ca              True    lab-ca-secret            2s
cert-manager-demo   wildcard-demo-lab   True    wildcard-demo-lab-tls    3s
cert-manager-demo   api-demo-lab        True    api-demo-lab-tls         3s
Press Ctrl+C to exit the watch.
5.4 Verify All Certificates Are Ready
kubectl get certificates -A
NAMESPACE           NAME                READY   SECRET                   AGE
cert-manager        lab-ca              True    lab-ca-secret            1m
cert-manager-demo   wildcard-demo-lab   True    wildcard-demo-lab-tls    1m
cert-manager-demo   api-demo-lab        True    api-demo-lab-tls         1m
5.5 Verify ClusterIssuers Again
Now check the lab-ca-issuer:
kubectl get clusterissuers lab-ca-issuer
NAME            READY   STATUS                  AGE
lab-ca-issuer   True    Signing CA verified     2m
The issuer is now ready because the Lab CA certificate has been created.
5.6 Examine Certificate Details
View the wildcard certificate details:
kubectl describe certificate wildcard-demo-lab -n cert-manager-demo
Name:         wildcard-demo-lab
Namespace:    cert-manager-demo
...
Spec:
  Common Name:  *.demo.lab
  Dns Names:
    *.demo.lab
    demo.lab
  Duration:     2160h0m0s
  Issuer Ref:
    Group:      cert-manager.io
    Kind:       ClusterIssuer
    Name:       lab-ca-issuer
  Private Key:
    Algorithm:  ECDSA
    Size:       256
  Renew Before:  720h0m0s
  Secret Name:   wildcard-demo-lab-tls
Status:
  Conditions:
    Type:    Ready
    Status:  True
    Reason:  Ready
    Message: Certificate is up to date and has not expired
  Not After:               2024-04-15T12:00:00Z
  Not Before:              2024-01-15T12:00:00Z
  Renewal Time:            2024-03-16T12:00:00Z
5.7 Verify TLS Secrets
Check that the TLS secrets have been created:
kubectl get secrets -n cert-manager-demo | grep tls
NAME                    TYPE                DATA   AGE
wildcard-demo-lab-tls   kubernetes.io/tls   3      2m
api-demo-lab-tls        kubernetes.io/tls   3      2m
Examine the wildcard certificate:
kubectl get secret wildcard-demo-lab-tls -n cert-manager-demo -o jsonpath='{.data.tls\.crt}' | base64 -d | openssl x509 -text -noout | head -20
Certificate:
    Data:
        Version: 3 (0x2)
        Serial Number: ...
        Signature Algorithm: ecdsa-with-SHA256
        Issuer: O = Demo Lab, CN = Demo Lab Certificate Authority
        Validity
            Not Before: Jan 15 12:00:00 2024 GMT
            Not After : Apr 15 12:00:00 2024 GMT
        Subject: O = Demo Lab, CN = *.demo.lab
        Subject Public Key Info:
            Public Key Algorithm: id-ecPublicKey
                Public-Key: (256 bit)
NoteNotice theIssuer field shows "Demo Lab Certificate Authority" - this proves the certificate was signed by our Lab CA, not self-signed.
6. Configure TLS Gateway and Routes
In this final configuration phase, you'll create the Gateway with TLS listeners and HTTPRoutes for each application.
6.1 Understand the TLS Gateway
Examine the Gateway manifest:
cat k8s-manifests/gateway.yaml
apiVersion: gateway.networking.k8s.io/v1
kind: Gateway
metadata:
  name: tls-gateway
  namespace: default
spec:
  gatewayClassName: tigera-gateway-class
  listeners:
    # HTTP listener for HTTP to HTTPS redirects
    - name: http
      protocol: HTTP
      port: 80
      allowedRoutes:
        namespaces:
          from: All

    # HTTPS listener for store.demo.lab (wildcard cert)
    - name: https-store
      protocol: HTTPS
      port: 443
      hostname: "store.demo.lab"
      tls:
        mode: Terminate
        certificateRefs:
          - name: wildcard-demo-lab-tls
            namespace: cert-manager-demo
            kind: Secret
      allowedRoutes:
        namespaces:
          from: All

    # HTTPS listener for blog.demo.lab (same wildcard cert)
    - name: https-blog
      ...

    # HTTPS listener for api.demo.lab (dedicated cert)
    - name: https-api
      ...
Key points:
- Four listeners: HTTP (port 80) + three HTTPS (port 443)
- Each HTTPS listener has a specific hostname
tls.certificateRefspoints to the certificate secrets- Store and Blog share the wildcard certificate
- API has its own dedicated certificate
6.2 Create the TLS Gateway
kubectl apply -f k8s-manifests/gateway.yaml
gateway.gateway.networking.k8s.io/tls-gateway created
6.3 Verify Gateway Status
Check that the Gateway is programmed:
kubectl get gateway tls-gateway
NAME          CLASS                  ADDRESS        PROGRAMMED   AGE
tls-gateway   tigera-gateway-class   10.100.1.100   True         30s
Note the external IP address - you'll use this to access the services.
6.4 Check Gateway Details
View detailed Gateway status:
kubectl describe gateway tls-gateway | grep secret
Look for the listener statuses - all should show Attached: True and ResolvedRefs: True.
6.5 Create the ReferenceGrant
The Gateway needs permission to reference secrets in the cert-manager-demo namespace. Examine and create the ReferenceGrant:
cat k8s-manifests/reference-grant.yaml
kubectl apply -f k8s-manifests/reference-grant.yaml
referencegrant.gateway.networking.k8s.io/allow-gateway-secrets created
6.6 Understand HTTPRoutes
Examine the HTTPRoutes manifest:
cat k8s-manifests/httproutes.yaml
Each HTTPRoute:
- Attaches to the TLS Gateway
- Specifies a hostname
- Routes traffic to the appropriate backend service
- Includes HTTP to HTTPS redirect rules
6.7 Create the HTTPRoutes
kubectl apply -f k8s-manifests/httproutes.yaml
httproute.gateway.networking.k8s.io/store-route created
httproute.gateway.networking.k8s.io/blog-route created
httproute.gateway.networking.k8s.io/api-route created
httproute.gateway.networking.k8s.io/http-redirect created
6.8 Verify HTTPRoutes
Check the HTTPRoutes status:
kubectl get httproutes -n default
NAME            HOSTNAMES              AGE
store-route     ["store.demo.lab"]     30s
blog-route      ["blog.demo.lab"]      30s
api-route       ["api.demo.lab"]       30s
http-redirect                          30s
7. Test the Setup
Now let's test the complete TLS setup from the user container.
7.1 Get the Gateway IP
GATEWAY_IP=$(kubectl get gateway tls-gateway -o jsonpath='{.status.addresses[0].value}')
echo "Gateway IP: $GATEWAY_IP"
7.2 Add DNS Entries to User Container
Add the hostnames to the user container's /etc/hosts:
sudo docker exec clab-ingress-tls-user sh -c "echo '$GATEWAY_IP store.demo.lab blog.demo.lab api.demo.lab' >> /etc/hosts"
Verify the entries were added:
sudo docker exec clab-ingress-tls-user cat /etc/hosts
7.3 Add Lab CA as Trusted Certificate
Extract the Lab CA certificate and copy it to the user container:
# Extract the Lab CA certificate from Kubernetes
kubectl get secret lab-ca-secret -n cert-manager -o jsonpath='{.data.tls\.crt}' | base64 -d > /tmp/lab-ca.crt

# Copy the CA certificate to the user container
sudo docker cp /tmp/lab-ca.crt clab-ingress-tls-user:/tmp/lab-ca.crt
Verify the CA certificate was copied:
sudo docker exec clab-ingress-tls-user cat /tmp/lab-ca.crt
-----BEGIN CERTIFICATE-----
MIIBqDCCAU... (Lab CA certificate content)
-----END CERTIFICATE-----
7.4 Test HTTPS Access with Certificate Verification
Now test HTTPS access using the --cacert flag to verify the certificate against our Lab CA.
Test the Store application from the user container:
sudo docker exec clab-ingress-tls-user curl -v --cacert /tmp/lab-ca.crt https://store.demo.lab/ 2>&1 | grep -E "(subject|issuer|SSL|verify)"
* SSL connection using TLSv1.3 / TLS_AES_256_GCM_SHA384
*  SSL certificate verify ok.
*   subject: O=Demo Lab; CN=*.demo.lab
*   issuer: O=Demo Lab; OU=Infrastructure; CN=Demo Lab Certificate Authority
Test the Blog application:
sudo docker exec clab-ingress-tls-user curl -v --cacert /tmp/lab-ca.crt https://blog.demo.lab/ 2>&1 | grep -E "(subject|issuer|SSL|verify)"
* SSL connection using TLSv1.3 / TLS_AES_256_GCM_SHA384
*  SSL certificate verify ok.
*   subject: O=Demo Lab; CN=*.demo.lab
*   issuer: O=Demo Lab; OU=Infrastructure; CN=Demo Lab Certificate Authority
Test the API application (dedicated certificate):
sudo docker exec clab-ingress-tls-user curl -v --cacert /tmp/lab-ca.crt https://api.demo.lab/ 2>&1 | grep -E "(subject|issuer|SSL|verify)"
* SSL connection using TLSv1.3 / TLS_AES_256_GCM_SHA384
*  SSL certificate verify ok.
*   subject: O=Demo Lab; CN=api.demo.lab
*   issuer: O=Demo Lab; OU=Infrastructure; CN=Demo Lab Certificate Authority
NoteNotice the
SSL certificate verify okmessage - this confirms the Lab CA is properly trusted and the certificate chain is valid. The--cacertflag tells curl to use our Lab CA certificate for verification.
7.5 Test HTTP to HTTPS Redirect
Test that HTTP requests are redirected to HTTPS:
sudo docker exec clab-ingress-tls-user curl -v http://store.demo.lab/ 2>&1 | grep -E "(Location|HTTP)"
< HTTP/1.1 301 Moved Permanently
< Location: https://store.demo.lab/
7.6 Verify Certificate Chain
Examine the full certificate chain for the wildcard cert:
sudo docker exec clab-ingress-tls-user sh -c "echo | openssl s_client -connect store.demo.lab:443 -servername store.demo.lab 2>/dev/null | openssl x509 -text -noout | grep -A2 'Subject:'"
7.7 Test Certificate Renewal Simulation
Rendering diagram…
Component Interactions Explained:
| Component | Role | Interaction |
|---|---|---|
| cert-manager Controller | Certificate lifecycle manager | Watches Certificate resources and their secrets, triggers renewal when needed |
| Certificate Resource | Desired state definition | Defines cert specs (duration, domains, issuer) |
| ClusterIssuer | CA configuration | References the Lab CA for signing certificates |
| Lab CA | Root Certificate Authority | Signs new certificates with its private key |
| Secret | Certificate storage | Stores tls.crt and tls.key for gateway consumption |
| Envoy Gateway Controller | Gateway reconciler | Watches secrets, updates xDS configuration |
| xDS Server | Config distribution | Pushes updated certificates to Envoy via SDS (Secret Discovery Service) |
| Envoy Proxy | TLS termination | Hot-reloads certificates without connection drops |
TipThe entire renewal process happens automatically and without downtime. The Envoy proxy performs a hot-reload of the TLS context, meaning existing connections continue uninterrupted while new connections receive the updated certificate.
cert-manager automatically renews certificates before expiry. Let's simulate a renewal and verify the new certificate is loaded by the Envoy gateway.
Step 1: Note the current certificate serial number
# Get the current certificate serial number from the gateway
sudo docker exec clab-ingress-tls-user sh -c "echo | openssl s_client -connect api.demo.lab:443 -servername api.demo.lab 2>/dev/null | openssl x509 -noout -serial"
serial=1A2B3C4D5E6F...
Save this serial number for comparison later.
Step 2: Delete the certificate secret to trigger renewal
kubectl delete secret api-demo-lab-tls -n cert-manager-demo
Step 3: Watch cert-manager recreate the certificate
kubectl get certificate api-demo-lab -n cert-manager-demo -w
NAME           READY   SECRET             AGE
api-demo-lab   False   api-demo-lab-tls   5m
api-demo-lab   True    api-demo-lab-tls   5m
Press Ctrl+C to exit the watch once it shows READY=True.
Step 4: Verify the new certificate has a different serial number
# Get the new certificate serial number from Kubernetes
kubectl get secret api-demo-lab-tls -n cert-manager-demo -o jsonpath='{.data.tls\.crt}' | base64 -d | openssl x509 -noout -serial
serial=7F8E9D0C1B2A... # Different from the original!
Step 5: Verify the gateway is serving the new certificate
The Envoy gateway automatically picks up the new certificate from the Secret. Test it:
# Get the serial number being served by the gateway
sudo docker exec clab-ingress-tls-user sh -c "echo | openssl s_client -connect api.demo.lab:443 -servername api.demo.lab 2>/dev/null | openssl x509 -noout -serial"
serial=7F8E9D0C1B2A... # Matches the new certificate!
Step 6: Verify full connectivity with the new certificate
sudo docker exec clab-ingress-tls-user curl -v --cacert /tmp/lab-ca.crt https://api.demo.lab/ 2>&1 | grep -E "(SSL|verify|subject)"
* SSL connection using TLSv1.3 / TLS_AES_256_GCM_SHA384
*  SSL certificate verify ok.
*   subject: O=Demo Lab; CN=api.demo.lab
NoteThe Envoy gateway watches for Secret changes and automatically reloads certificates without requiring a restart. This is a key feature for zero-downtime certificate rotation.
Optional: Monitor Envoy Gateway Logs During Rotation
You can watch the Envoy gateway logs to see certificate reload events in real-time:
# In a separate terminal, start watching the Envoy gateway logs
kubectl logs -n tigera-gateway -l gateway.envoyproxy.io/owning-gateway-name=tls-gateway -f
When you delete and recreate a certificate secret, you'll see log entries like:
[info] xDS: received config update for sds_cluster - version: xxx
[info] Secret resources updated: api-demo-lab-tls
[info] sds: updating secret for listener.443.api.demo.lab
You can also check the Envoy Gateway controller logs for Secret watch events:
# Watch the Envoy Gateway controller logs
kubectl logs -n envoy-gateway-system -l control-plane=envoy-gateway -f
Look for entries related to Secret reconciliation:
"msg":"reconciled Secret","namespace":"cert-manager-demo","name":"api-demo-lab-tls"
"msg":"updating xDS snapshot","gateway":"default/tls-gateway"
Summary
This lab demonstrated automated TLS certificate management with cert-manager:
| Phase | What You Learned |
|---|---|
| Phase 1 | Install cert-manager and verify its components |
| Phase 2 | Deploy demo applications that need TLS |
| Phase 3 | Create ClusterIssuers for different CAs |
| Phase 4 | Issue wildcard and dedicated certificates |
| Phase 5 | Configure TLS Gateway with certificate references |
| Phase 6 | Test and verify HTTPS connectivity |
Certificate Strategy Summary:
| App | Hostname | Certificate | Type |
|---|---|---|---|
| Store | store.demo.lab | *.demo.lab | Wildcard (shared) |
| Blog | blog.demo.lab | *.demo.lab | Wildcard (shared) |
| API | api.demo.lab | api.demo.lab | Dedicated |
Key Takeaways:
- cert-manager automates the entire certificate lifecycle - issuance, renewal, and rotation
- ClusterIssuers provide cluster-wide certificate authority configuration
- Local CAs demonstrate the same concepts as production PKI without external dependencies
- Wildcard certificates reduce management overhead for multiple subdomains
- Dedicated certificates provide better security isolation for critical services
- Gateway API provides native TLS termination with certificate references
Troubleshooting
cert-manager Not Installing
If cert-manager fails to install:
# Check if CRDs are installed
kubectl get crds | grep cert-manager

# Check cert-manager namespace
kubectl get pods -n cert-manager

# Check cert-manager logs
kubectl logs -n cert-manager -l app=cert-manager
Certificate Not Ready
If a certificate is not becoming ready:
# Check certificate status
kubectl describe certificate <name> -n <namespace>

# Check certificate request
kubectl get certificaterequest -n <namespace>

# Check cert-manager logs
kubectl logs -n cert-manager -l app=cert-manager -f
CA Issuer Shows "Secret Not Found"
If lab-ca-issuer shows an error about missing secret:
# Check if the Lab CA certificate was created
kubectl get certificate lab-ca -n cert-manager

# Verify the secret exists
kubectl get secret lab-ca-secret -n cert-manager

# If missing, re-apply the certificates
kubectl apply -f tls-config/certificates.yaml
Gateway TLS Not Working
If TLS termination is not working:
# Check if secrets exist
kubectl get secrets -n cert-manager-demo | grep tls

# Check Gateway status
kubectl describe gateway tls-gateway

# Check Envoy proxy logs
kubectl logs -n tigera-gateway -l gateway.envoyproxy.io/owning-gateway-name=tls-gateway
Additional Notes
Switching Between Issuers
You can change a certificate's issuer without recreating it:
- Update the certificate to use a different issuer:
# Example: Switch from lab-ca-issuer to selfsigned-issuer
kubectl patch certificate api-demo-lab -n cert-manager-demo --type='json' -p='[
  {"op": "replace", "path": "/spec/issuerRef/name", "value": "selfsigned-issuer"}
]'
- Delete the existing secret to trigger re-issuance:
kubectl delete secret api-demo-lab-tls -n cert-manager-demo
- Watch the certificate be re-issued:
kubectl get certificate api-demo-lab -n cert-manager-demo -w
Certificate Rotation Best Practices
| Setting | Recommended Value | Reason |
|---|---|---|
| Duration | 90 days | Industry standard, balances security & ops |
| Renew Before | 30 days | Allows time to fix issues |
| Private Key Algorithm | ECDSA P-256 | Modern, efficient, strong security |
| Key Rotation | Enabled | Fresh key on each renewal |
cert-manager Architecture
┌─────────────────────────────────────────────────────────────────────────┐
│                        CERT-MANAGER ARCHITECTURE                        │
├─────────────────────────────────────────────────────────────────────────┤
│                                                                         │
│  ┌──────────────────┐    ┌──────────────────┐    ┌──────────────────┐   │
│  │   Controller     │    │    CA Injector   │    │     Webhook      │   │
│  │                  │    │                  │    │                  │   │
│  │ • Watches CRs    │    │ • Injects CA     │    │ • Validates CRs  │   │
│  │ • Issues certs   │    │   bundles        │    │ • Mutates CRs    │   │
│  │ • Multiple       │    │ • Updates        │    │ • Converts       │   │
│  │   issuer types   │    │   annotations    │    │   versions       │   │
│  └────────┬─────────┘    └──────────────────┘    └──────────────────┘   │
│           │                                                             │
│           ▼                                                             │
│  ┌─────────────────────────────────────────────────────────────────┐    │
│  │                      Custom Resources                           │    │
│  │  ┌───────────┐  ┌────────────┐  ┌───────────┐  ┌────────────┐   │    │
│  │  │ClusterIss.│  │Certificate │  │CertReq    │  │Order       │   │    │
│  │  └───────────┘  └────────────┘  └───────────┘  └────────────┘   │    │
│  └─────────────────────────────────────────────────────────────────┘    │
│                                                                         │
└─────────────────────────────────────────────────────────────────────────┘
Certificate Issuance Flow
1. Certificate CR Created
         │
         ▼
2. cert-manager Controller detects Certificate
         │
         ▼
3. CertificateRequest CR created
         │
         ▼
4. Issuer processes request
         │
         ├── Self-signed: Generates immediately (signs with own key)
         │
         └── CA: Signs with CA private key (used in this lab)
         │
         ▼
5. TLS Secret created with certificate + key
         │
         ▼
6. Gateway picks up secret for TLS termination
         │
         ▼
7. HTTPS endpoint ready
NoteIn production with public CAs like Let's Encrypt, step 4 would include ACME challenges (HTTP-01 or DNS-01) to verify domain ownership. Our local CA skips this since we control both the CA and the domains.
Lab Cleanup
To cleanup the lab follow steps in Lab cleanup
Or run:
chmod +x destroy.sh
./destroy.sh