Calico IP Address Management (IPAM)
This lab demonstrates Calico's IP Address Management (IPAM) functionality in a 3-node Kind Kubernetes cluster.
Overview
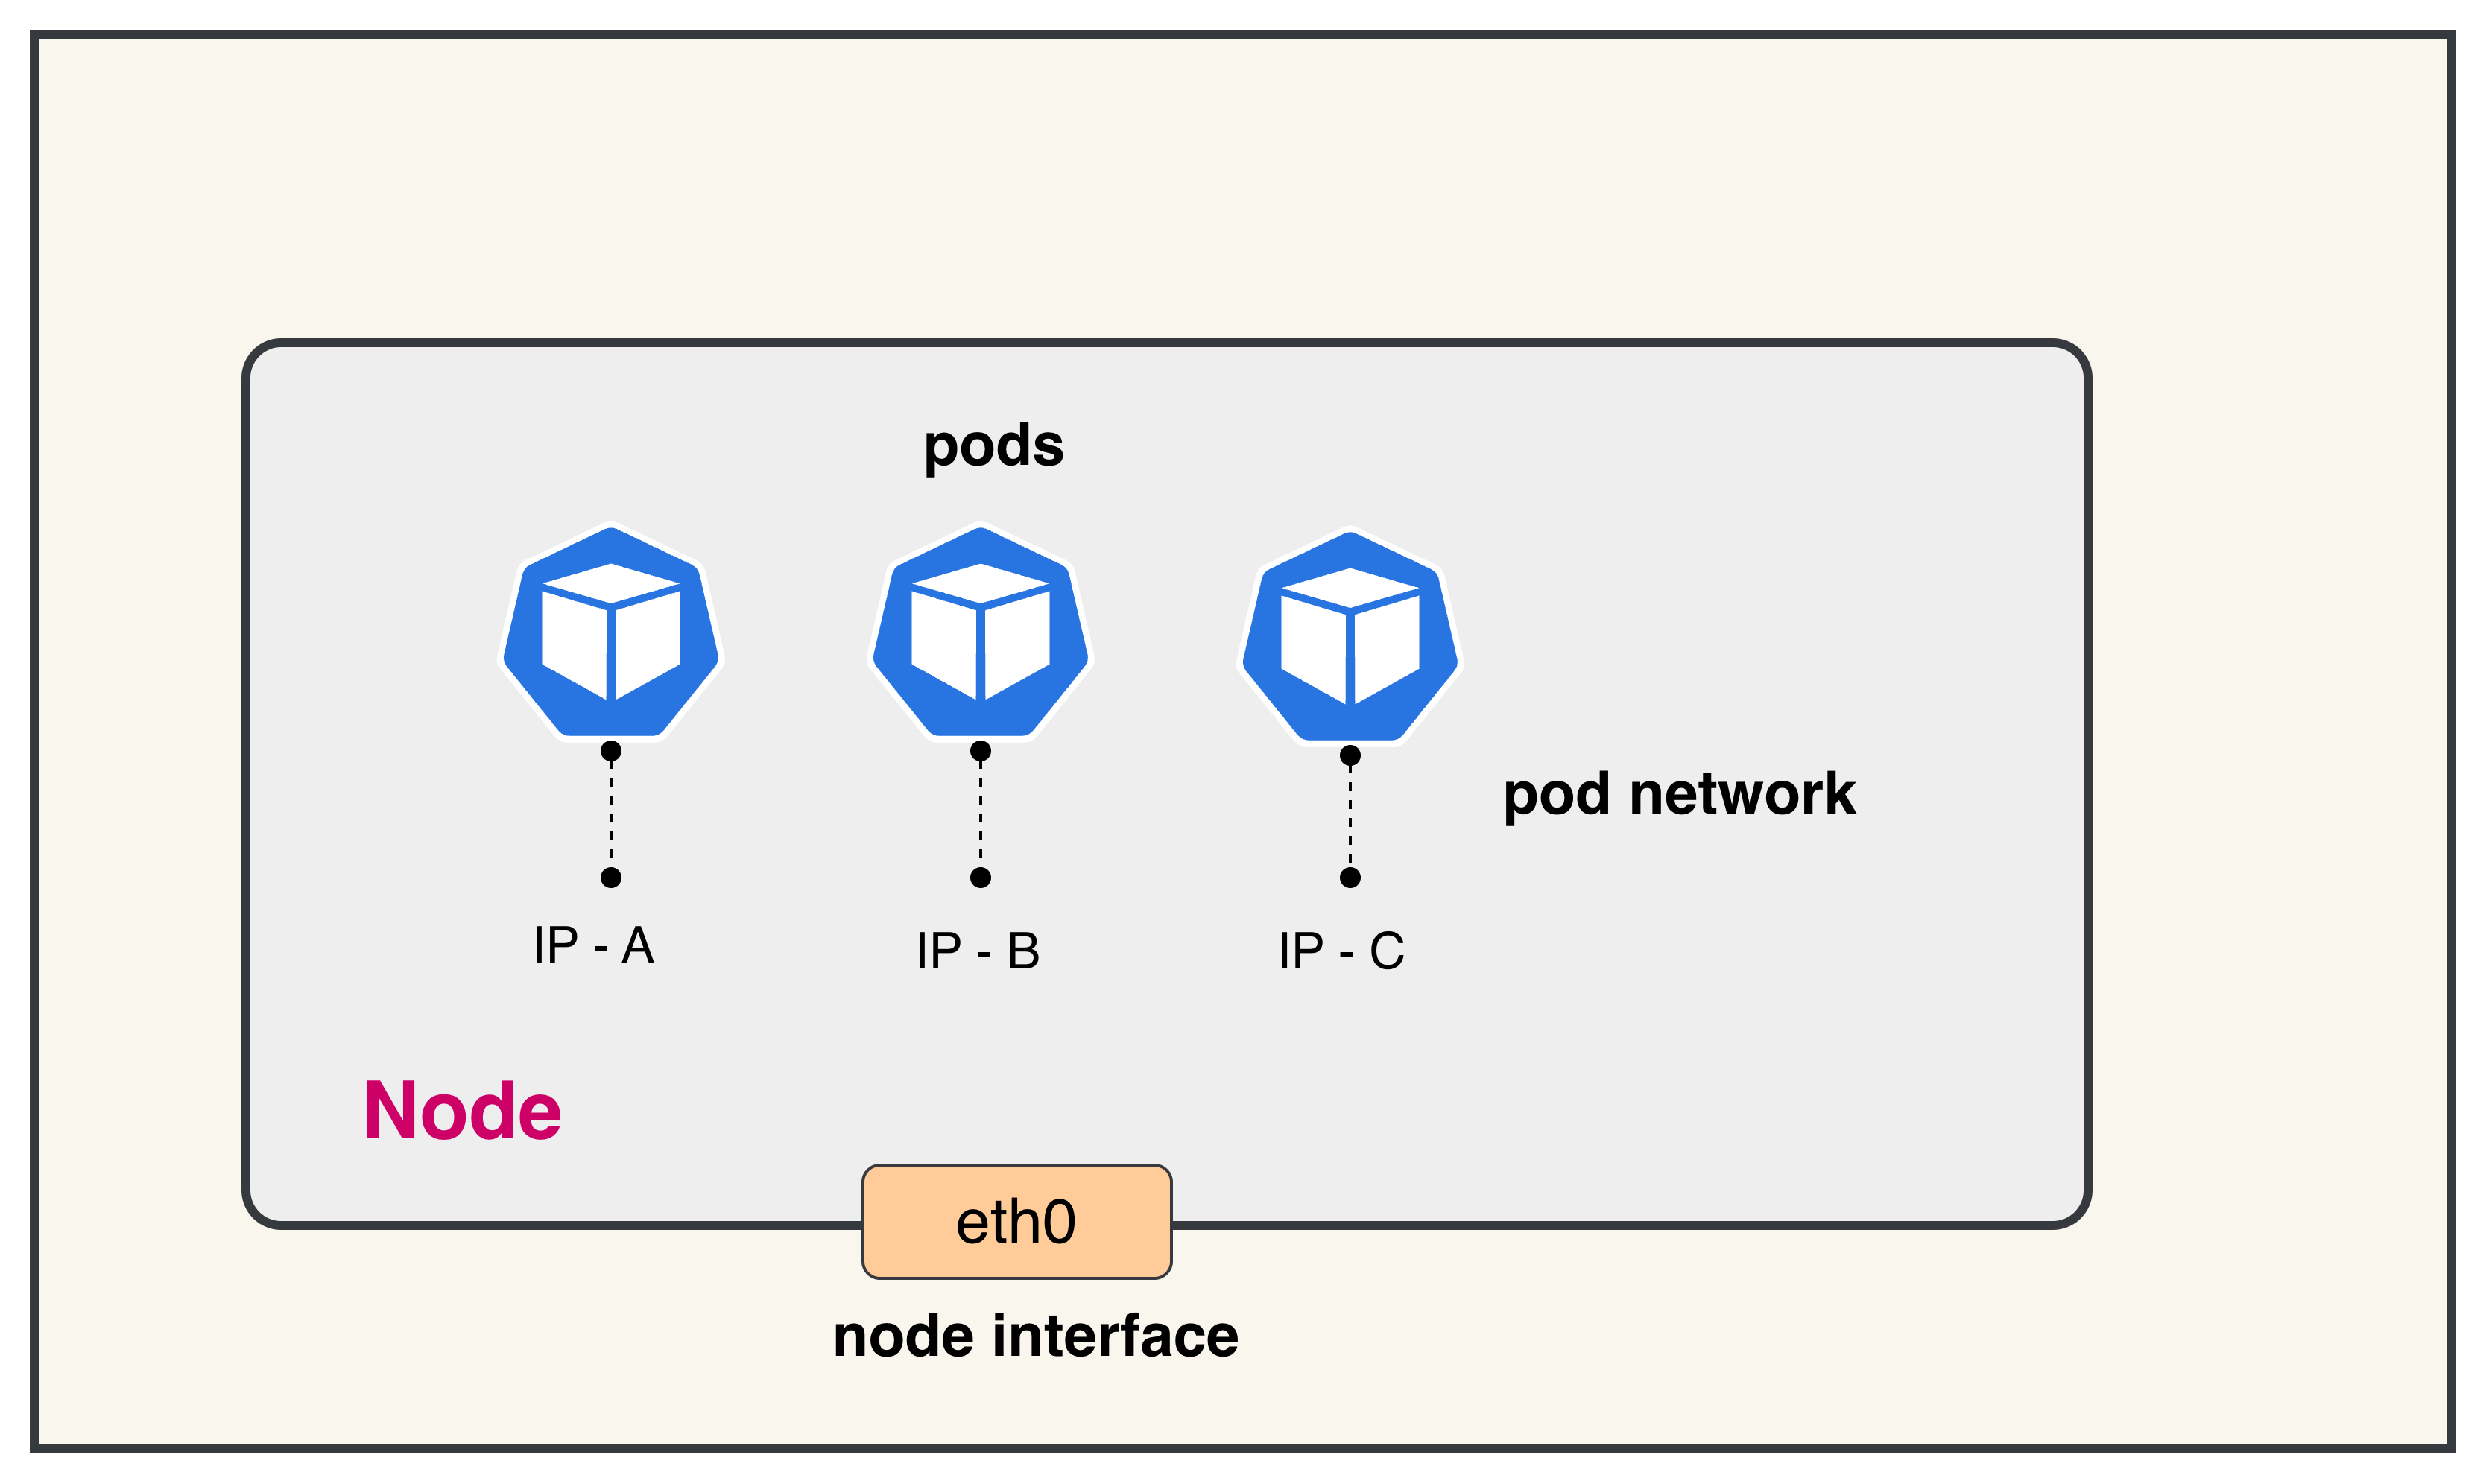
In Kubernetes, every pod needs a unique IP address to communicate with other pods and services. IPAM (IP Address Management) is crucial because:
1. Dynamic Pod Creation: Pods are ephemeral and created/destroyed frequently. Each new pod requires an available IP address from the cluster's address space.
2. Avoiding IP Conflicts: Without proper IPAM, multiple pods could be assigned the same IP address, causing network conflicts and communication failures.
3. Efficient Address Allocation: IPAM systems allocate IP addresses in blocks to nodes, reducing the overhead of individual IP requests and improving scalability.
4. Cross-Node Communication: Pods on different nodes need routable IP addresses within the cluster to communicate directly without NAT, which IPAM facilitates through proper subnet allocation.
Calico's IPAM provides efficient IP allocation by pre-allocating IP blocks to nodes, allowing for fast pod startup times while maintaining proper IP address management across the entire cluster.
Lab Setup
To setup the lab for this module Lab setup
The lab folder is - /containerlab/01-calico-ipam
Manifest Files
ContainerLab
| File | Description |
|---|---|
| calico-ipam.clab.yaml | ContainerLab topology defining the 3-node Kind cluster |
Kind Cluster
| File | Description |
|---|---|
| calico-ipam-no-cni.yaml | Kind cluster configuration without CNI |
Calico CNI
| File | Description |
|---|---|
| calico-cni-config/custom-resources.yaml | Custom Calico Installation resource with IPAM and IP pool configuration |
Deployment
The deploy.sh script automates the complete lab setup process:
- ContainerLab Topology Deployment: Creates a 3-node Kind cluster using the
calico-ipam.clab.yamlconfiguration - Kubeconfig Setup: Exports the Kind cluster's kubeconfig for kubectl access
- Calico Installation: Downloads and installs calicoctl, then deploys Calico CNI components:
- Calico Operator CRDs
- Tigera Operator
- Custom Calico resources with IPAM configuration
- Verification: Waits for all Calico components to become available before completion
Deploy the lab using:
chmod +x deploy.sh
./deploy.sh
Calico CNI Configuration
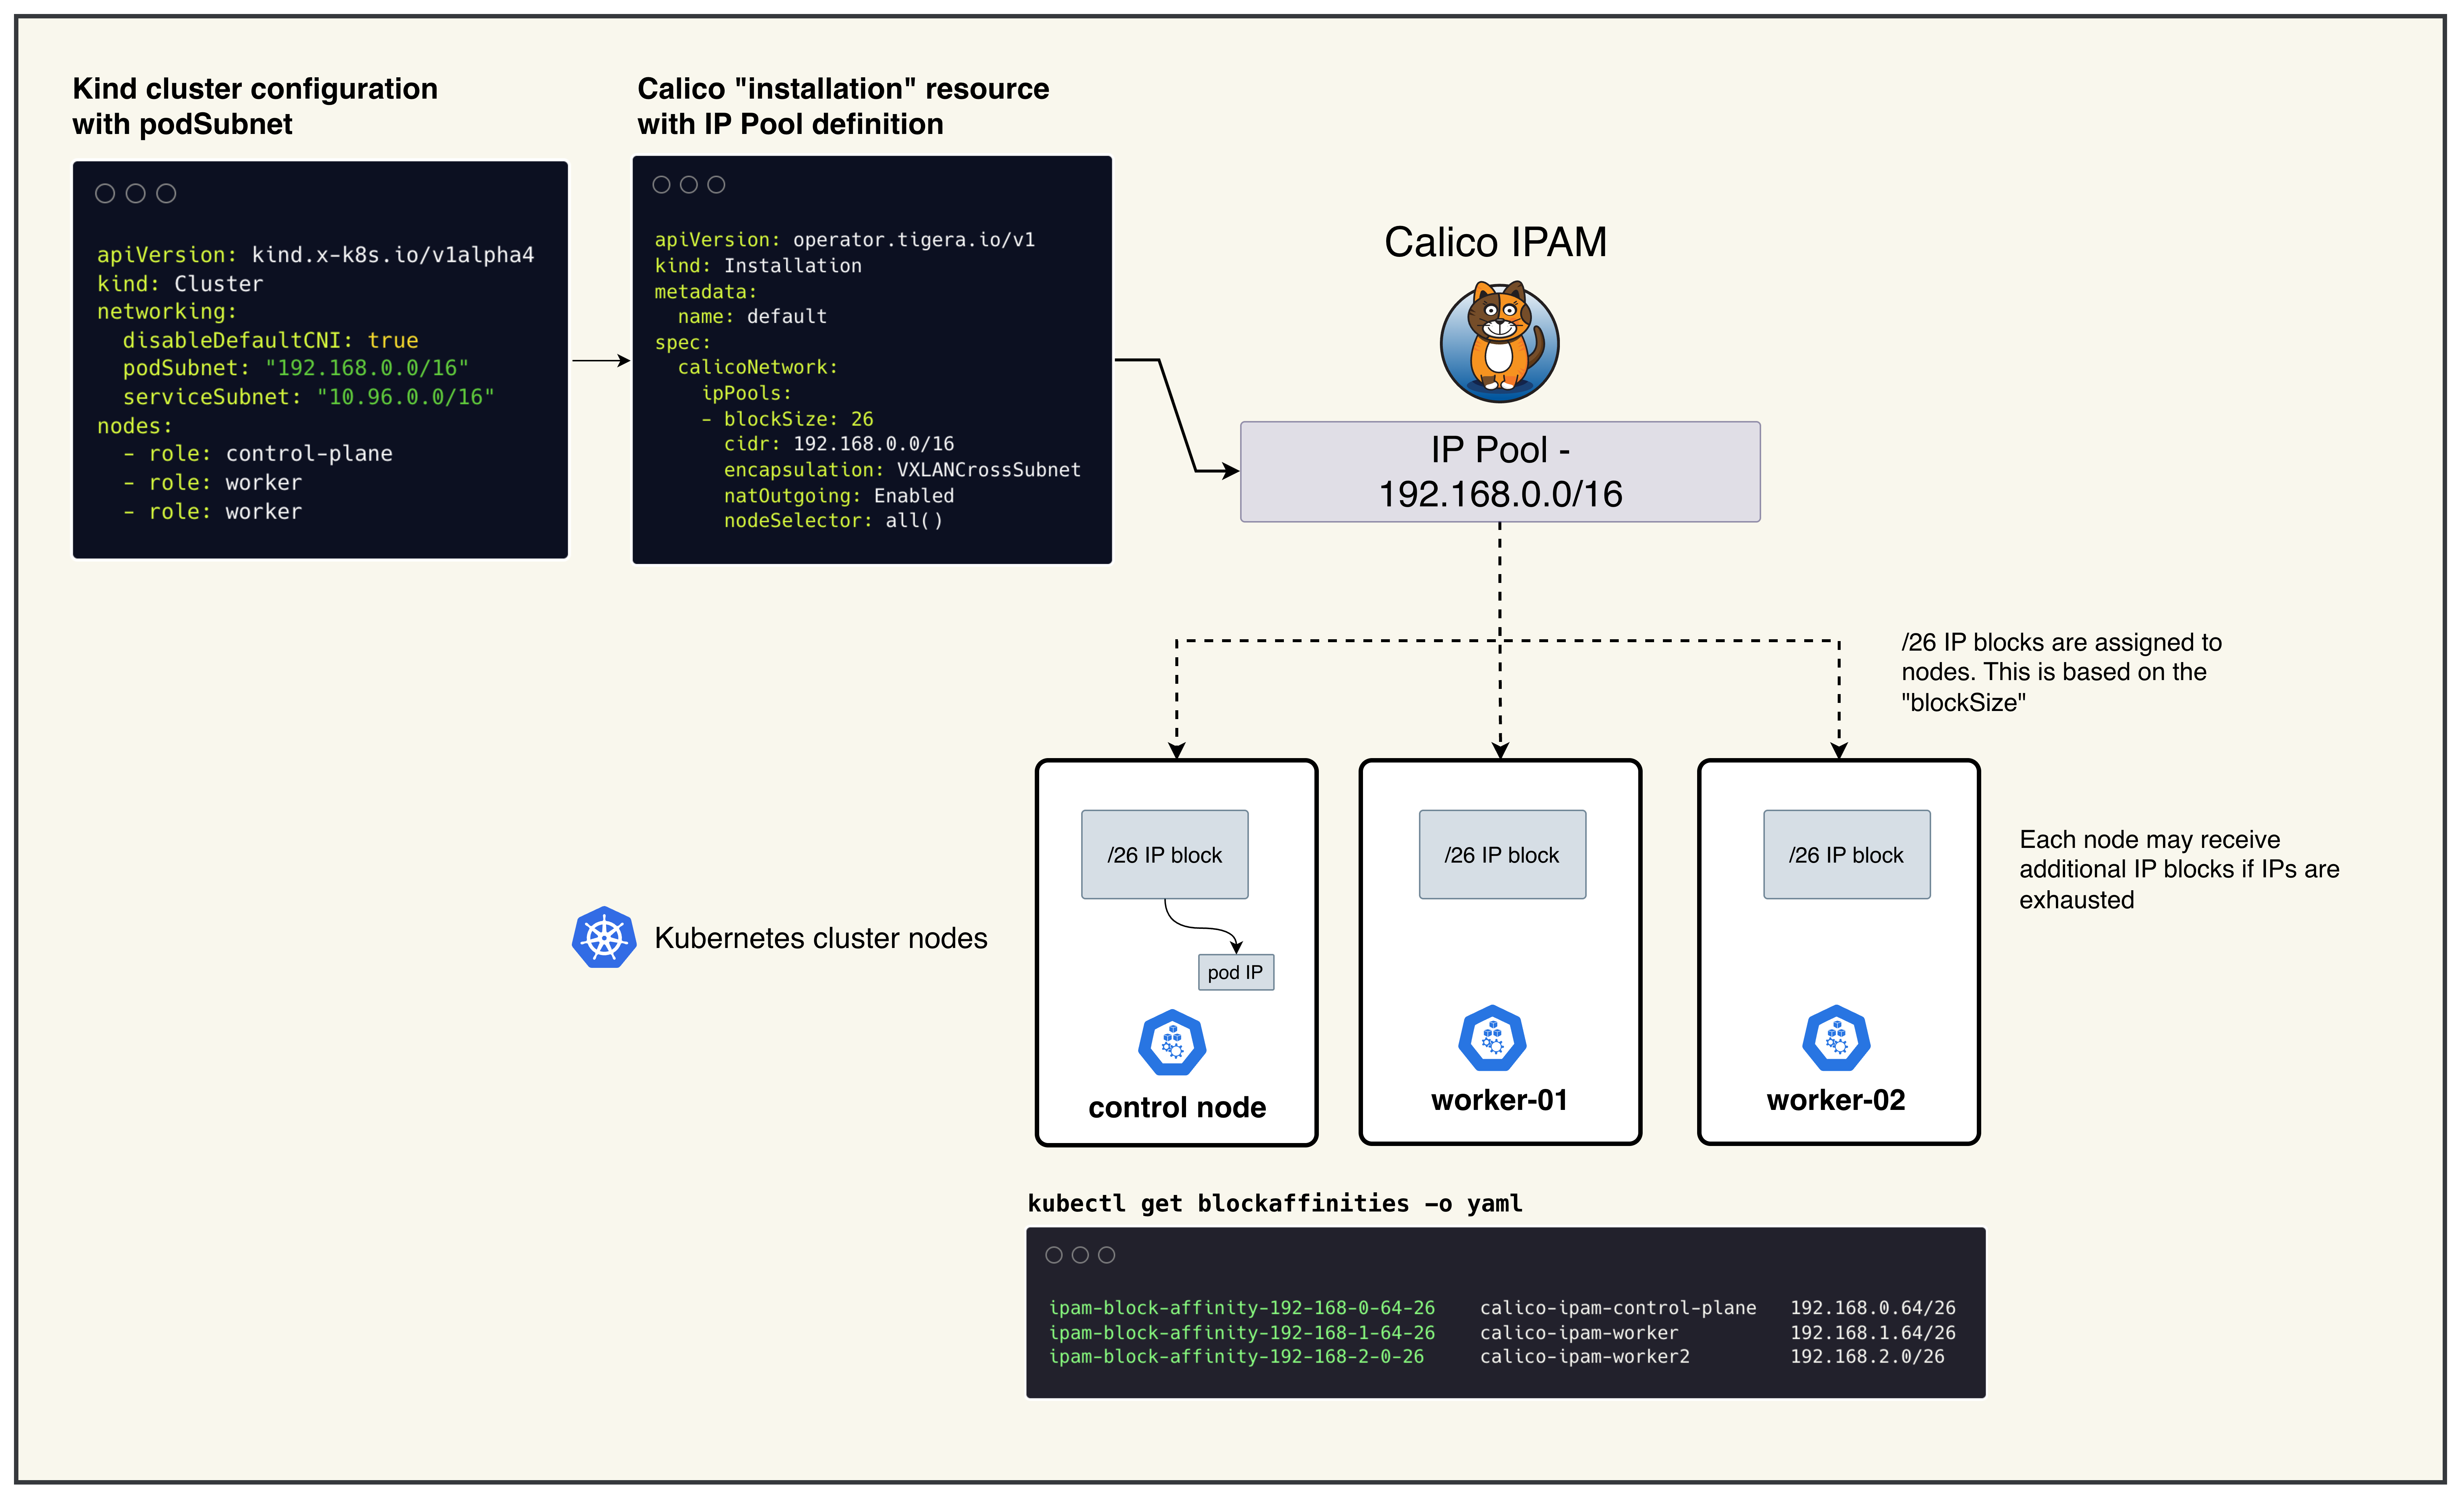
The Calico installation uses a custom Installation resource (custom-resources.yaml) that defines the pod network configuration. Key considerations for the CIDR selection:
Default IP Pool CIDR: 192.168.0.0/16
- Size: Provides 65,536 IP addresses (sufficient for large clusters)
- Block Size: /26 blocks (64 IPs each) are allocated to nodes as needed
- Avoid Conflicts: Must not overlap with:
- Host machine networks
- Kubernetes service CIDR (10.96.0.0/16)
- Any existing VPN or corporate network ranges
- Encapsulation: Uses VXLANCrossSubnet for pod-to-pod communication across nodes
- NAT Outgoing: Enabled to allow pods to reach external networks
The CIDR choice directly impacts cluster scalability and network policy effectiveness. The /16 range allows for approximately 1,024 nodes with /26 blocks, making it suitable for most lab and production environments.
Lab Exercises
NoteThe outputs in this section will be different in your lab. When running the commands given in this section, make sure you replace IP addresses, interface names, and node names as per your lab.
After deployment, verify the cluster is ready.
1. Inspect ContainerLab Topology
containerlab inspect -t calico-ipam.clab.yaml
Output:
╭───────────────────────────┬──────────────────────┬─────────┬───────────────────────╮
│            Name           │      Kind/Image      │  State  │     IPv4/6 Address    │
├───────────────────────────┼──────────────────────┼─────────┼───────────────────────┤
│ calico-ipam-control-plane │ k8s-kind             │ running │ 172.18.0.3            │
│                           │ kindest/node:v1.28.0 │         │ fc00:f853:ccd:e793::3 │
├───────────────────────────┼──────────────────────┼─────────┼───────────────────────┤
│ calico-ipam-worker        │ k8s-kind             │ running │ 172.18.0.2            │
│                           │ kindest/node:v1.28.0 │         │ fc00:f853:ccd:e793::2 │
├───────────────────────────┼──────────────────────┼─────────┼───────────────────────┤
│ calico-ipam-worker2       │ k8s-kind             │ running │ 172.18.0.4            │
│                           │ kindest/node:v1.28.0 │         │ fc00:f853:ccd:e793::4 │
╰───────────────────────────┴──────────────────────┴─────────┴───────────────────────╯
2. Check Calico Installation Status
export KUBECONFIG=/home/ubuntu/containerlab/1-calico-ipam/calico-ipam.kubeconfig
kubectl get tigerastatus
Output:
NAME        AVAILABLE   PROGRESSING   DEGRADED   SINCE
apiserver   True        False         False      2m30s
calico      True        False         False      2m45s
- NAME: Calico component being monitored
- AVAILABLE: Whether the component is fully operational
- PROGRESSING: Whether the component is still being deployed/updated
- DEGRADED: Whether the component has any issues
- SINCE: How long the component has been in its current state
All components should show AVAILABLE: True and DEGRADED: False for a healthy installation.
3. Check Node Status
kubectl get nodes
Output:
NAME                       STATUS   ROLES           AGE   VERSION
calico-ipam-control-plane  Ready    control-plane   3m    v1.28.0
calico-ipam-worker         Ready    <none>          3m    v1.28.0
calico-ipam-worker2        Ready    <none>          3m    v1.28.0
- NAME: Node name as assigned by Kind
- STATUS: Node readiness state (should be
Ready) - ROLES: Node role (
control-planefor master,<none>for workers) - AGE: How long the node has been running
- VERSION: Kubernetes version running on the node
All nodes should show STATUS: Ready indicating they are healthy and can schedule pods.
4. Overall IPAM Status
calicoctl ipam show
Output:
+----------+-------------------+------------+------------+-------------------+
| GROUPING |       CIDR        | IPS TOTAL  | IPS IN USE |    IPS FREE       |
+----------+-------------------+------------+------------+-------------------+
| IP Pool  | 192.168.0.0/16    |      65536 |         10 |             65526 |
+----------+-------------------+------------+------------+-------------------+
This shows the IP pool configuration from your custom-resources.yaml.
- CIDR: The overall pod network range (192.168.0.0/16)
- IPs TOTAL: Total available IP addresses in the pool (65,536)
- IPs IN USE: Currently allocated IP addresses to pods
- IPs FREE: Available IP addresses for new pod allocation
5. Block Affinities List
kubectl get blockaffinities
Output:
NAME                                         AGE
ipam-block-affinity-192-168-0-64-26          2m
ipam-block-affinity-192-168-1-64-26          2m
ipam-block-affinity-192-168-2-0-26           2m
- BlockAffinity resources represent IPAM block assignments to nodes
- Each entry shows which IP block is assigned to which node
- The naming convention is
ipam-block-affinity-<block-cidr-with-dashes>-<prefix-length> - Calico allocates /26 blocks (64 IPs each) to nodes as needed
6. Detailed Block Affinities
kubectl get blockaffinities -o yaml
Output:
apiVersion: v1
items:
- apiVersion: crd.projectcalico.org/v1
  kind: BlockAffinity
  metadata:
    name: ipam-block-affinity-192-168-0-64-26
    namespace: ""
  spec:
    cidr: 192.168.0.64/26
    deleted: false
    node: calico-ipam-control-plane
    state: confirmed
- apiVersion: crd.projectcalico.org/v1
  kind: BlockAffinity
  metadata:
    name: ipam-block-affinity-192-168-1-64-26
  spec:
    cidr: 192.168.1.64/26
    deleted: false
    node: calico-ipam-worker
    state: confirmed
- spec.cidr: The specific IP block (e.g., 192.168.0.64/26) assigned to a node
- spec.node: The Kubernetes node that owns this IP block
- spec.state:
confirmed: Block is actively assigned and in usepending: Block assignment is in progress
- spec.deleted: Indicates if the block is marked for deletion
7. Formatted Block Affinities
kubectl get blockaffinities -o=jsonpath='{range .items[*]}{.metadata.name}{"\t"}{.spec.node}{"\t"}{.spec.cidr}{"\n"}{end}'
Output:
ipam-block-affinity-192-168-0-64-26    calico-ipam-control-plane    192.168.0.64/26
ipam-block-affinity-192-168-1-64-26    calico-ipam-worker          192.168.1.64/26
ipam-block-affinity-192-168-2-0-26     calico-ipam-worker2         192.168.2.0/26
This formatted output provides a clear mapping of which IP blocks are assigned to which nodes, making it easy to understand IP allocation across your cluster.
Summary
- IP Pools: Large CIDR ranges (like 192.168.0.0/16) that define the overall address space
- IP Blocks: Smaller subnets (like /26 blocks) carved out from IP pools and assigned to nodes
- Block Affinity: The assignment relationship between IP blocks and nodes
- IPAM: Calico automatically manages IP allocation within assigned blocks when pods are created
Troubleshooting
If you see issues with IP allocation:
- Check if nodes have sufficient IP blocks assigned
- Verify Calico pods are running:
kubectl get pods -n calico-system - Check node status:
kubectl get nodes - Review Calico logs:
kubectl logs -n calico-system -l k8s-app=calico-node
Lab Cleanup
to cleanup the lab follow steps in Lab cleanup